Amazon S3
This page covers how to use an Amazon S3 bucket as a data source in Rockset. This includes:
- Creating an Amazon S3 Integration to securely connect buckets in your AWS account with Rockset.
- Creating a Collection which syncs your data from a Amazon S3 bucket into Rockset.
For the following steps, you must have access to an AWS account and be able to manage AWS IAM policies and IAM users within it.
If you do not have access, please invite your AWS administrator to Rockset.
Create an S3 Integration
The steps below show how to set up an Amazon S3 integration using AWS Cross-Account IAM Roles and AWS Access Keys (deprecated). An integration can provide access to one or more S3 buckets within your AWS account. You can use an integration to create collections that sync data from your S3 buckets.
Step 1: Configure AWS IAM Policy
-
Navigate to the IAM Service in the AWS Management Console.
-
Set up a new policy by navigating to Policies and clicking "Create policy".
If you already have a policy set up for Rockset, you may update that existing policy.
For more details, refer to AWS Documentation on IAM Policies.

- Set up read-only access to your S3 bucket. You can switch to the
JSONtab and paste the policy shown below. You must replace<your-bucket>with the name of your S3 bucket. If you already have a Rockset policy set up, you can add the body of theStatementattribute to it.
{
  "Version": "2012-10-17",
  "Statement": [
    {
      "Effect": "Allow",
      "Action": ["s3:List*", "s3:GetObject"],
      "Resource": ["arn:aws:s3:::<your-bucket>", "arn:aws:s3:::<your-bucket>/*"]
    }
  ]
}
If you are attempting to restrict the policy to subdirectory /a/b, update the Resource object as follows:
"Resource": ["arn:aws:s3:::<your-bucket>", "arn:aws:s3:::<your-bucket>/a/b/*"]
- Optionally, if you have an S3 bucket that is encrypted with a KMS key, append the following statement to the
Statementattribute above.
{
  "Sid": "Decrypt",
  "Effect": "Allow",
  "Action": ["kms:Decrypt"],
  "Resource": ["arn:aws:kms:<your-region>:<your-account>:key/<your-key-id>"]
}
- Save the newly created or updated policy and give it a descriptive name. You will attach this policy to a user or role in the next step.
Why these Permissions?
s3:List*— Required. Rockset uses thes3:ListBucketands3:ListAllMyBucketspermissions to read bucket and object metadata.s3:GetObject— Required to retrieve objects from your Amazon S3 bucket.s3::PutObject— Optional. Rockset uses this to support INSERT INTO S3 queries.
Advanced Permissions
You can set up permissions for multiple buckets, or some specific paths by modifying the Resource ARNs. The format of the ARN for S3 is as follows: arn:aws:s3:::bucket_name/key_name.
You can substitute the following resources in the policy above to grant access to multiple buckets or prefixes as shown below:
- All paths under mybucket/salesdata:
arn:aws:s3:::mybucketarn:aws:s3:::mybucket/salesdata/*
- All buckets starting with
sales:arn:aws:s3:::sales*arn:aws:s3:::sales*/*
- All buckets in your account:
arn:aws:s3:::*arn:aws:s3:::*/*
For more details on how to specify a resource path, refer to AWS documentation on S3 ARNs.
Step 2: Configure Role / Access Key
There are two methods by which you can grant Rockset permissions to access your AWS resource. Although Access Keys are supported, Cross-Account roles are strongly recommended as they are more secure and easier to manage.
AWS Cross-Account IAM Role
The most secure way to grant Rockset access to your AWS account involves giving Rockset's account cross-account access to your AWS account. To do so, you need to create an IAM Role that assumes your newly created policy on Rockset's behalf.
You will need information from the Rockset Console to create and save this integration.
-
Navigate to the IAM service in the AWS Management Console.
-
Setup a new role by navigating to Roles and clicking "Create role".
If you already have a role for Rockset set up, you may re-use it and either add or update the above policy directly.

-
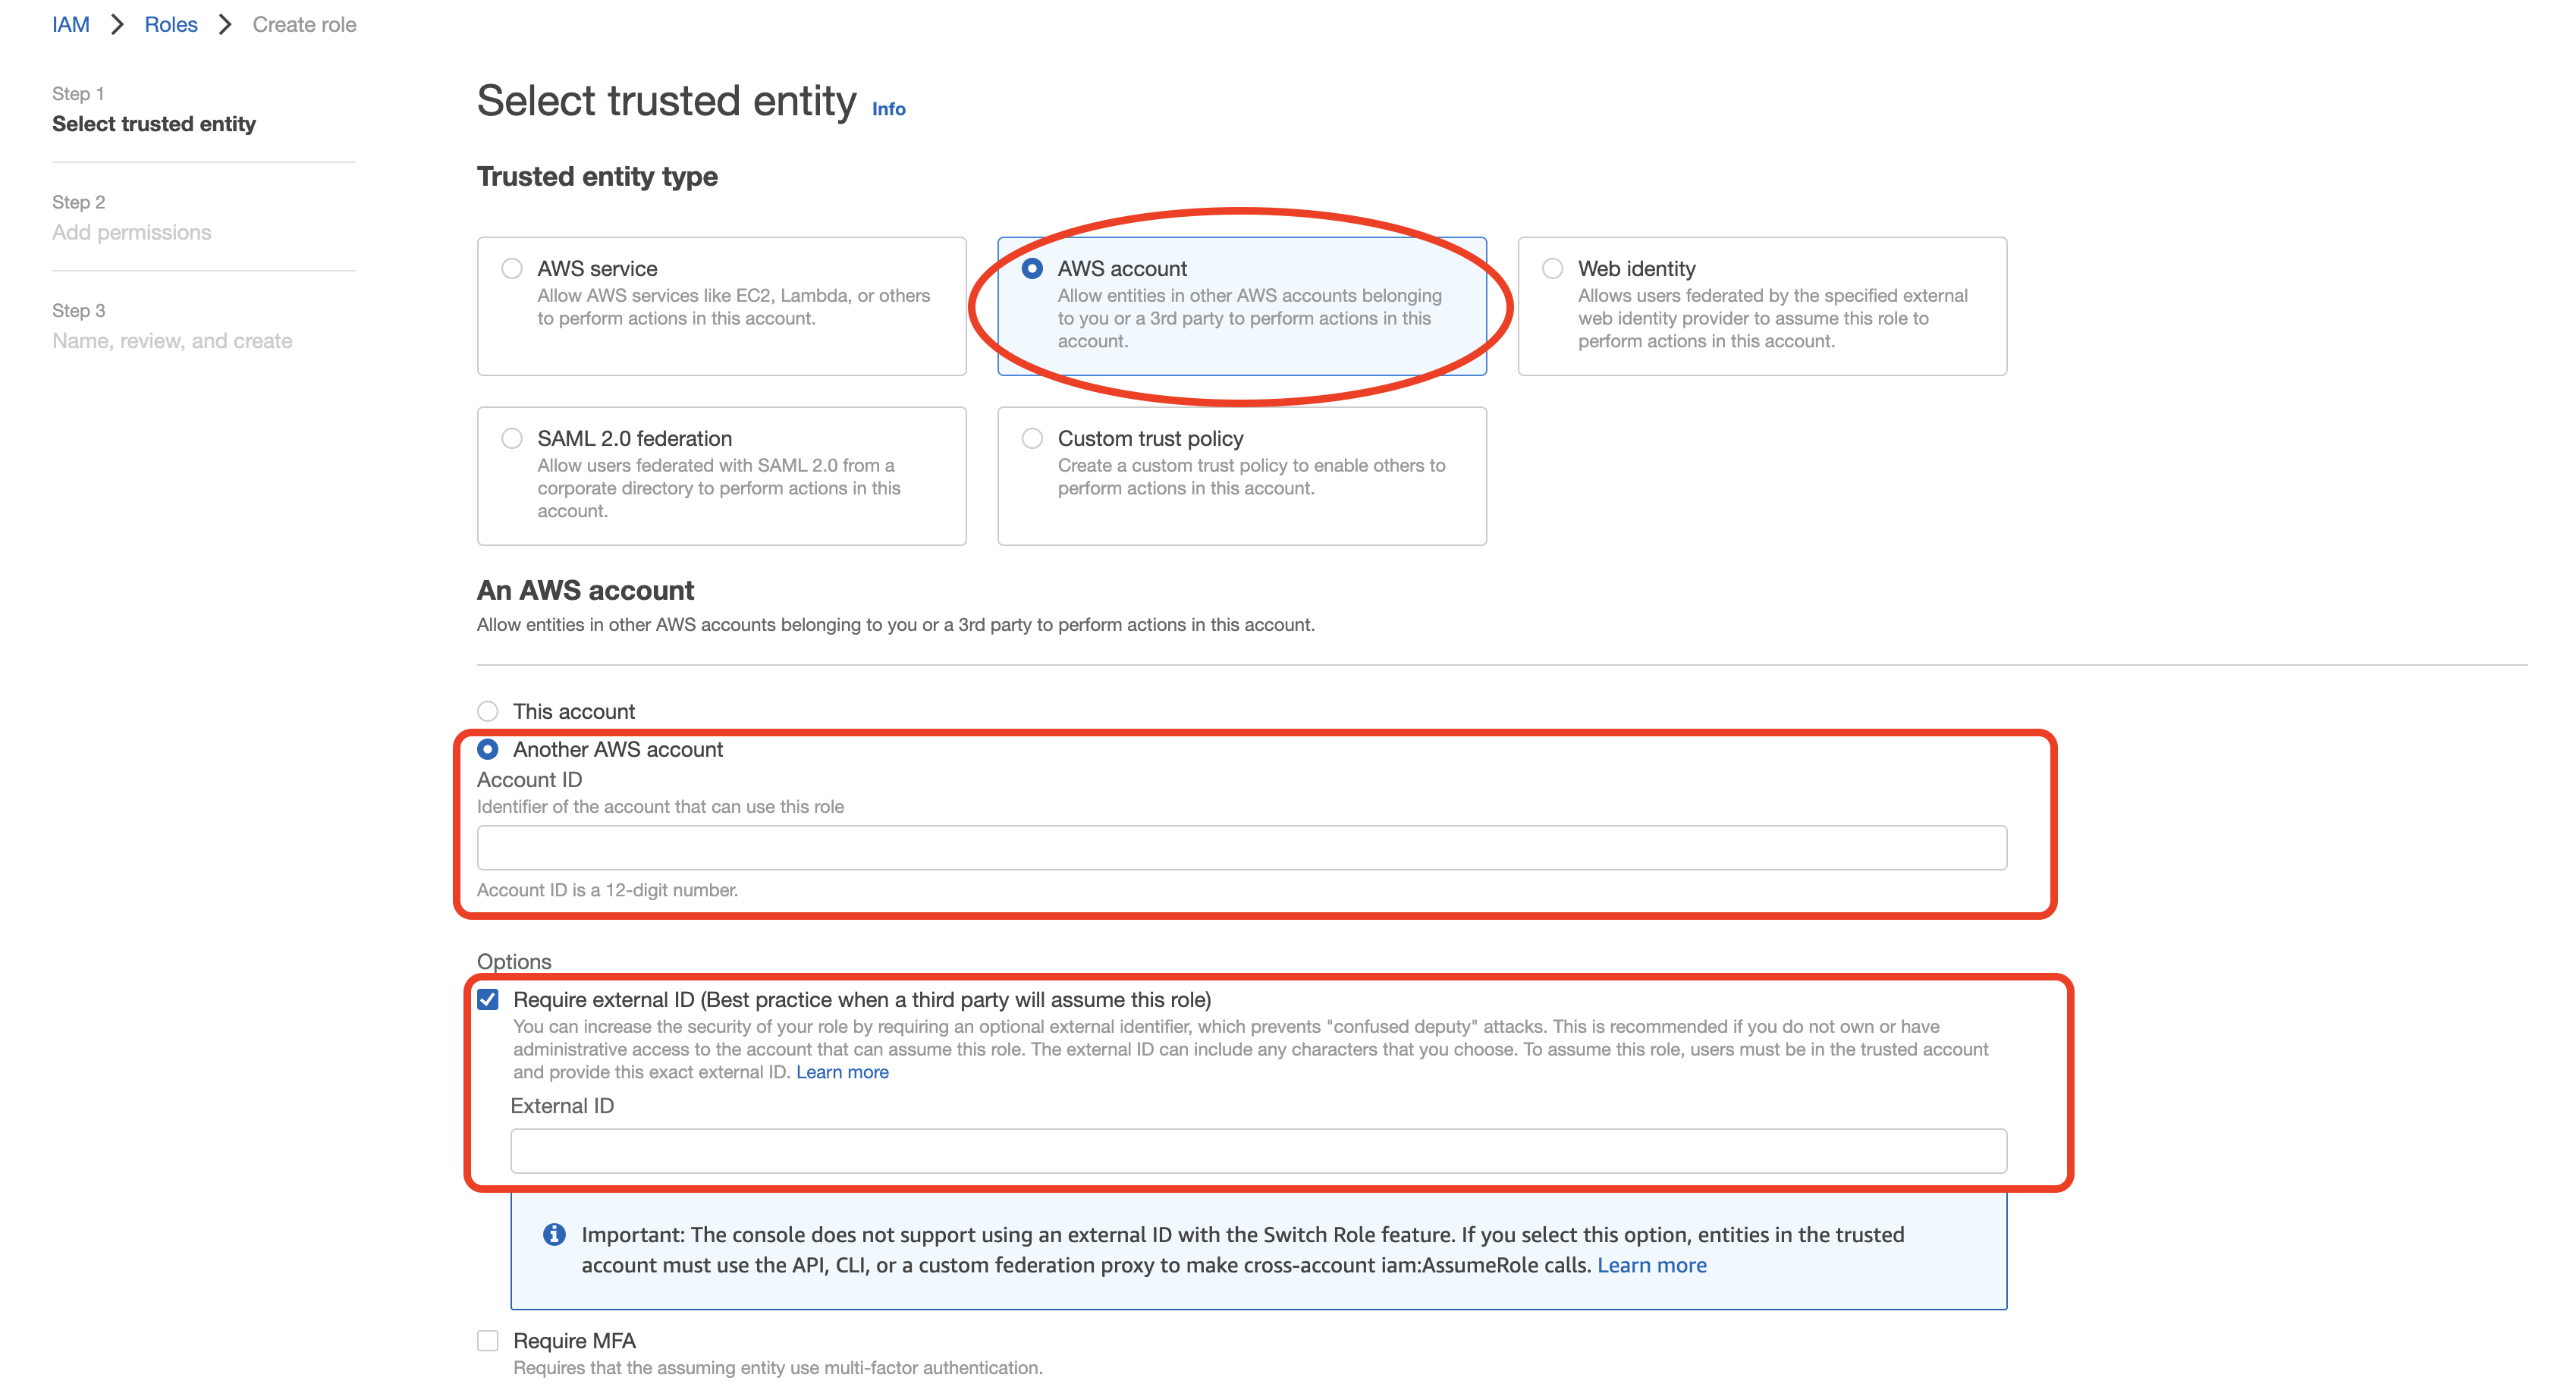
Select "Another AWS account" as type of trusted entity, and tick the box for "Require External ID". Fill in the Account ID and External ID fields with the values (Rockset Account ID and External ID respectively) found on the Integration page of the Rockset Console (under the Cross-Account Role Option). Click to continue.
-
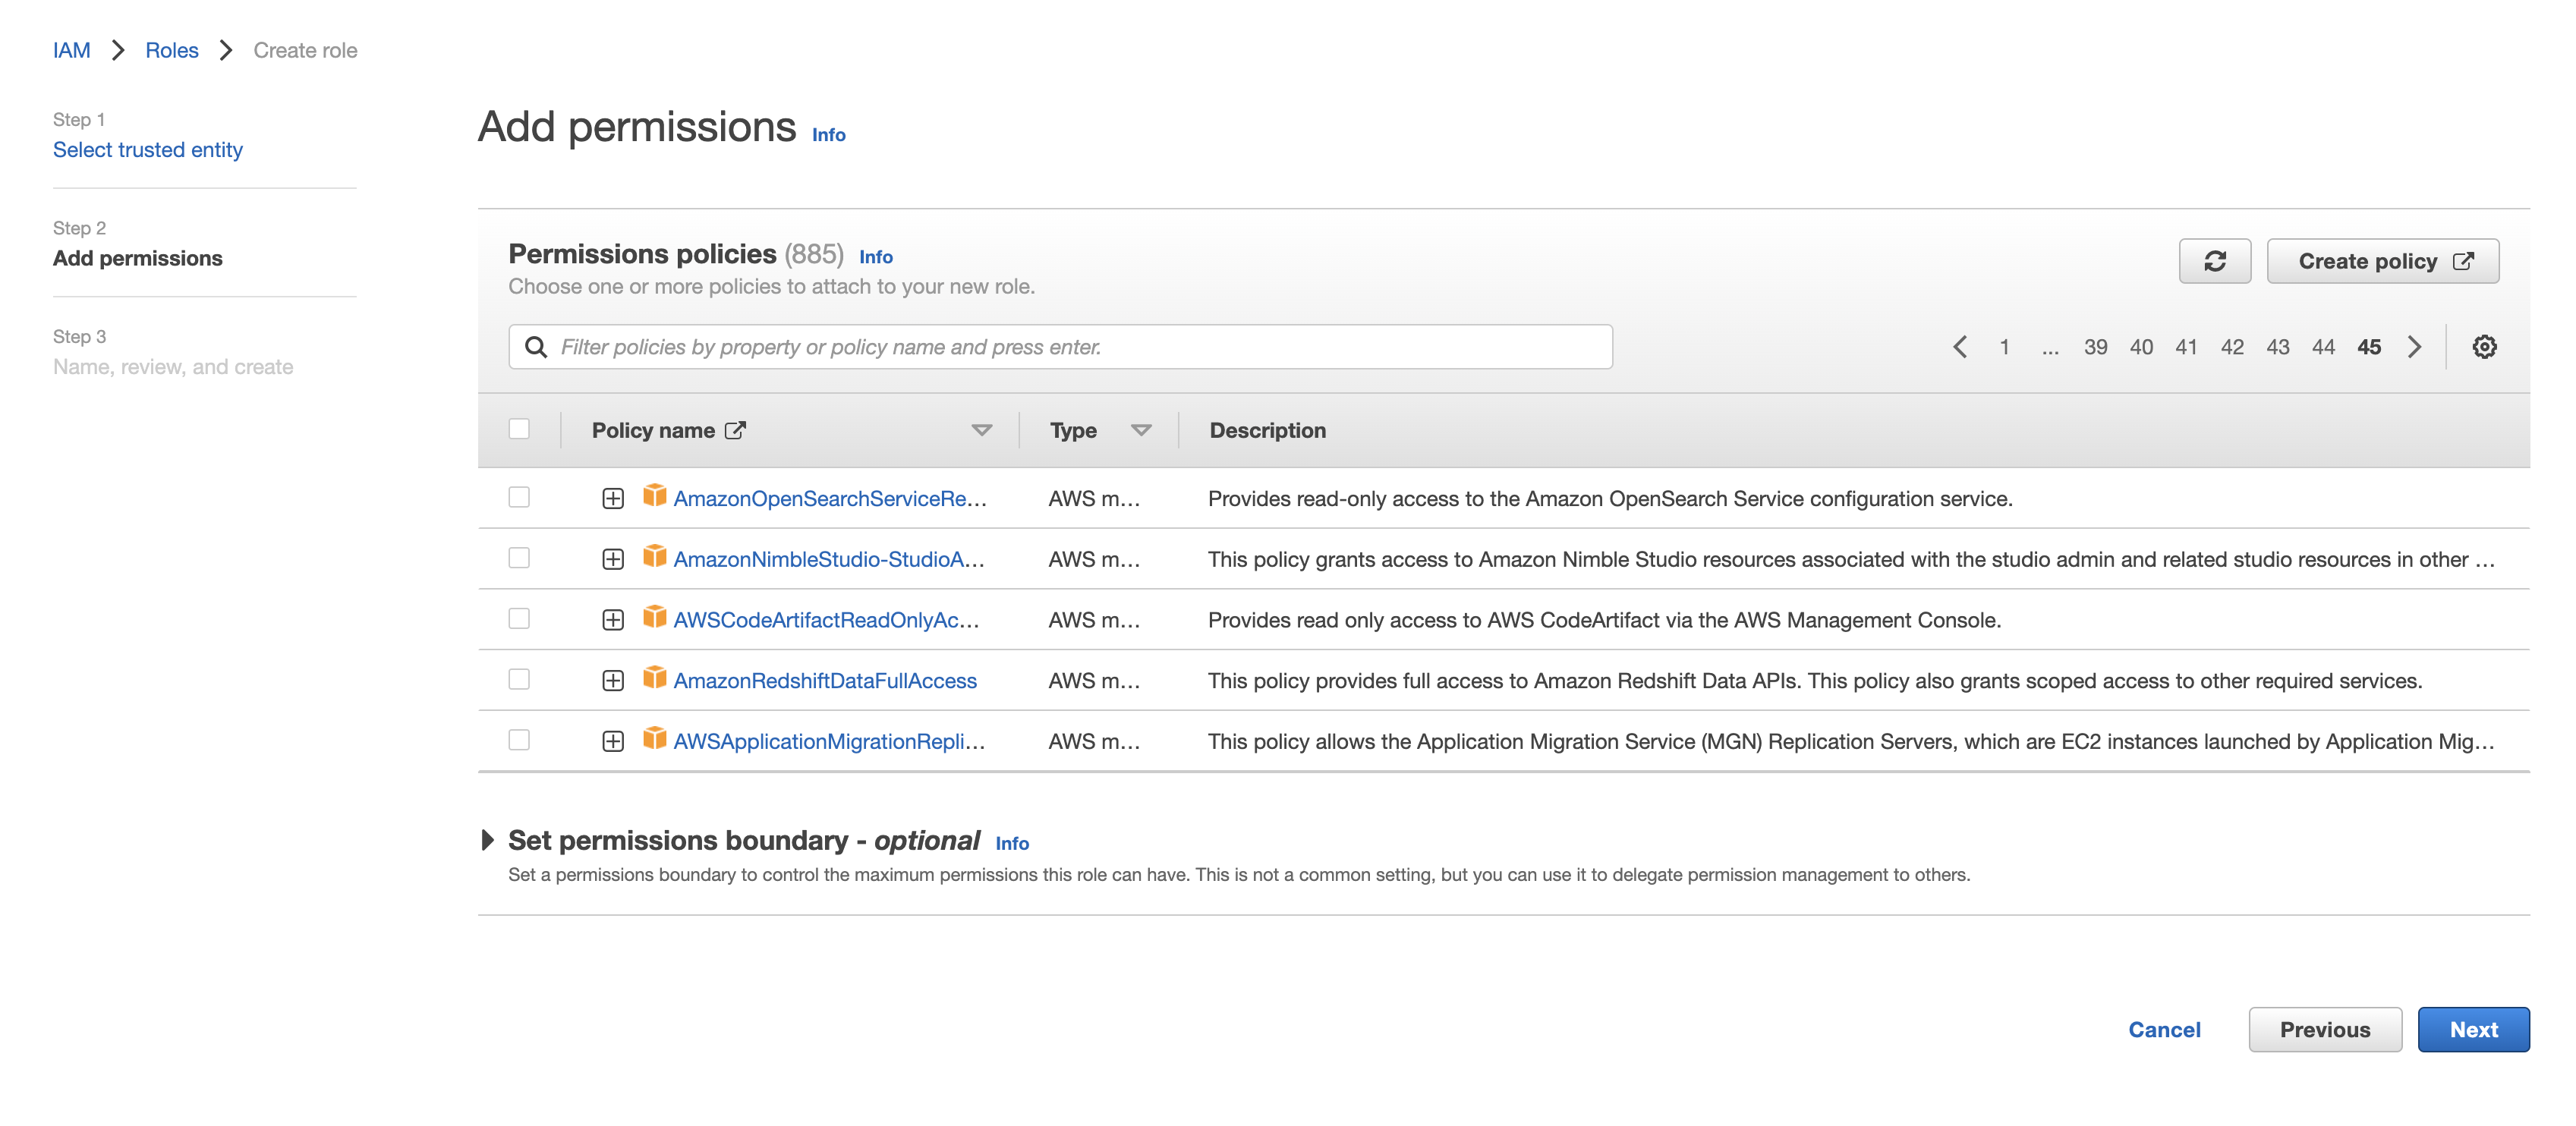
Choose the policy created for this role in Step 1 (or follow Step 1 now to create the policy if needed). Click to continue.
-
Optionally, add any tags and click "Next". Name the role descriptively (such as rockset-role), then record the Role ARN for the Rockset integration in the Rockset Console.
AWS Access Key (deprecated)
Navigate to the IAM service in the AWS Management Console.
-
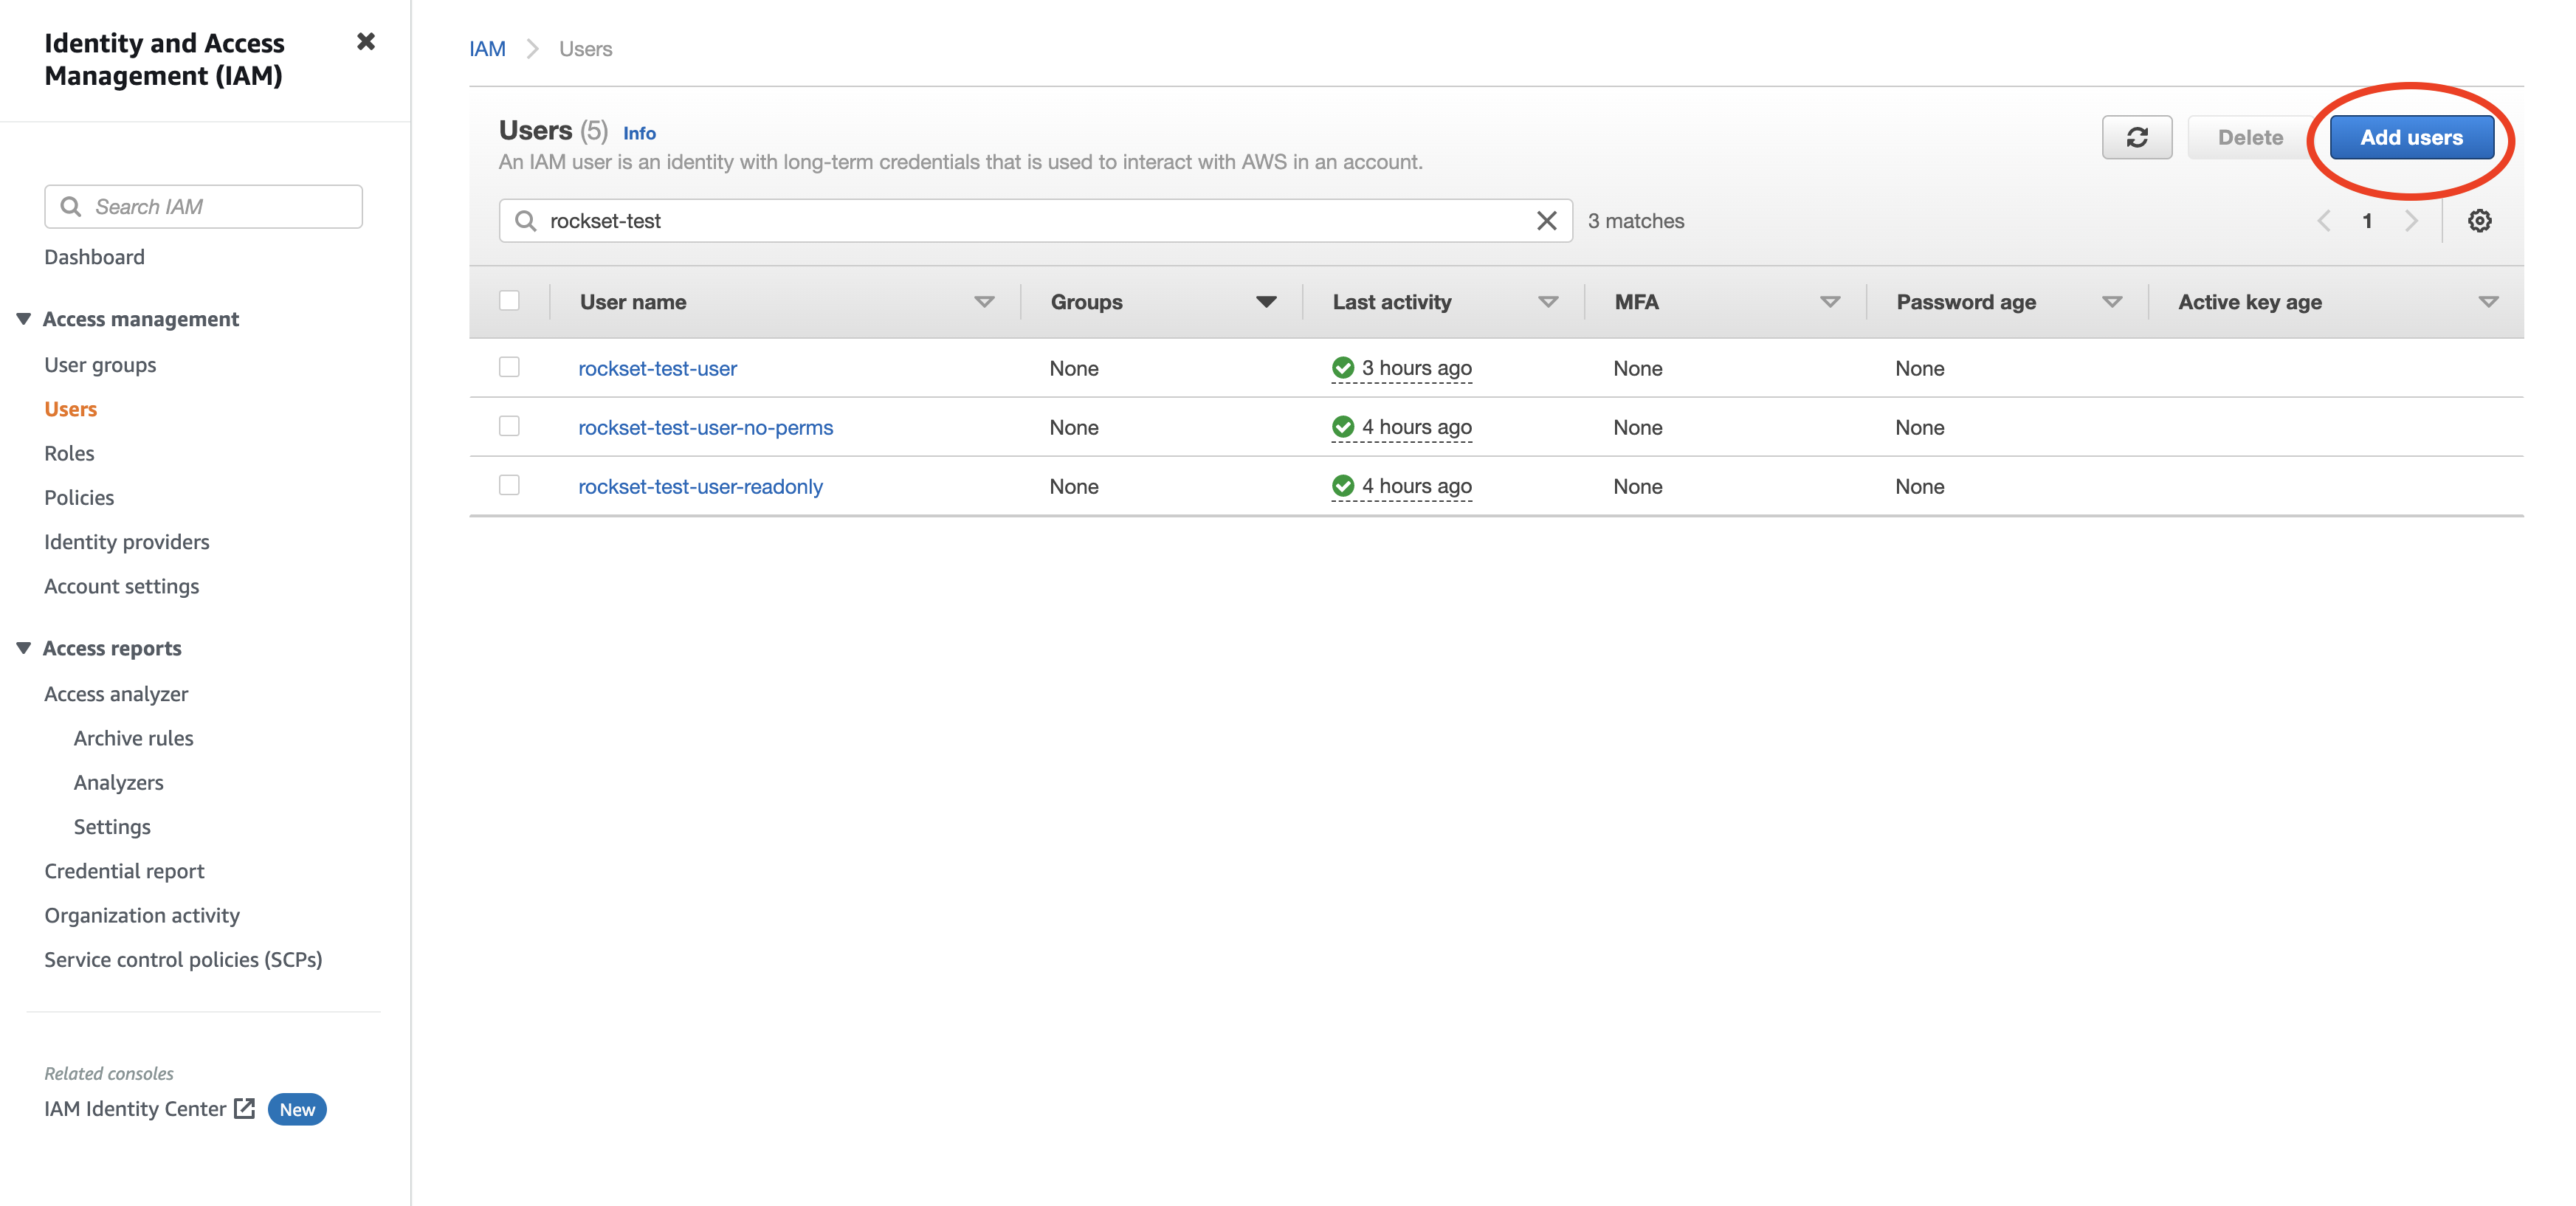
Create a new user by navigating to Users and clicking "Add User".
-
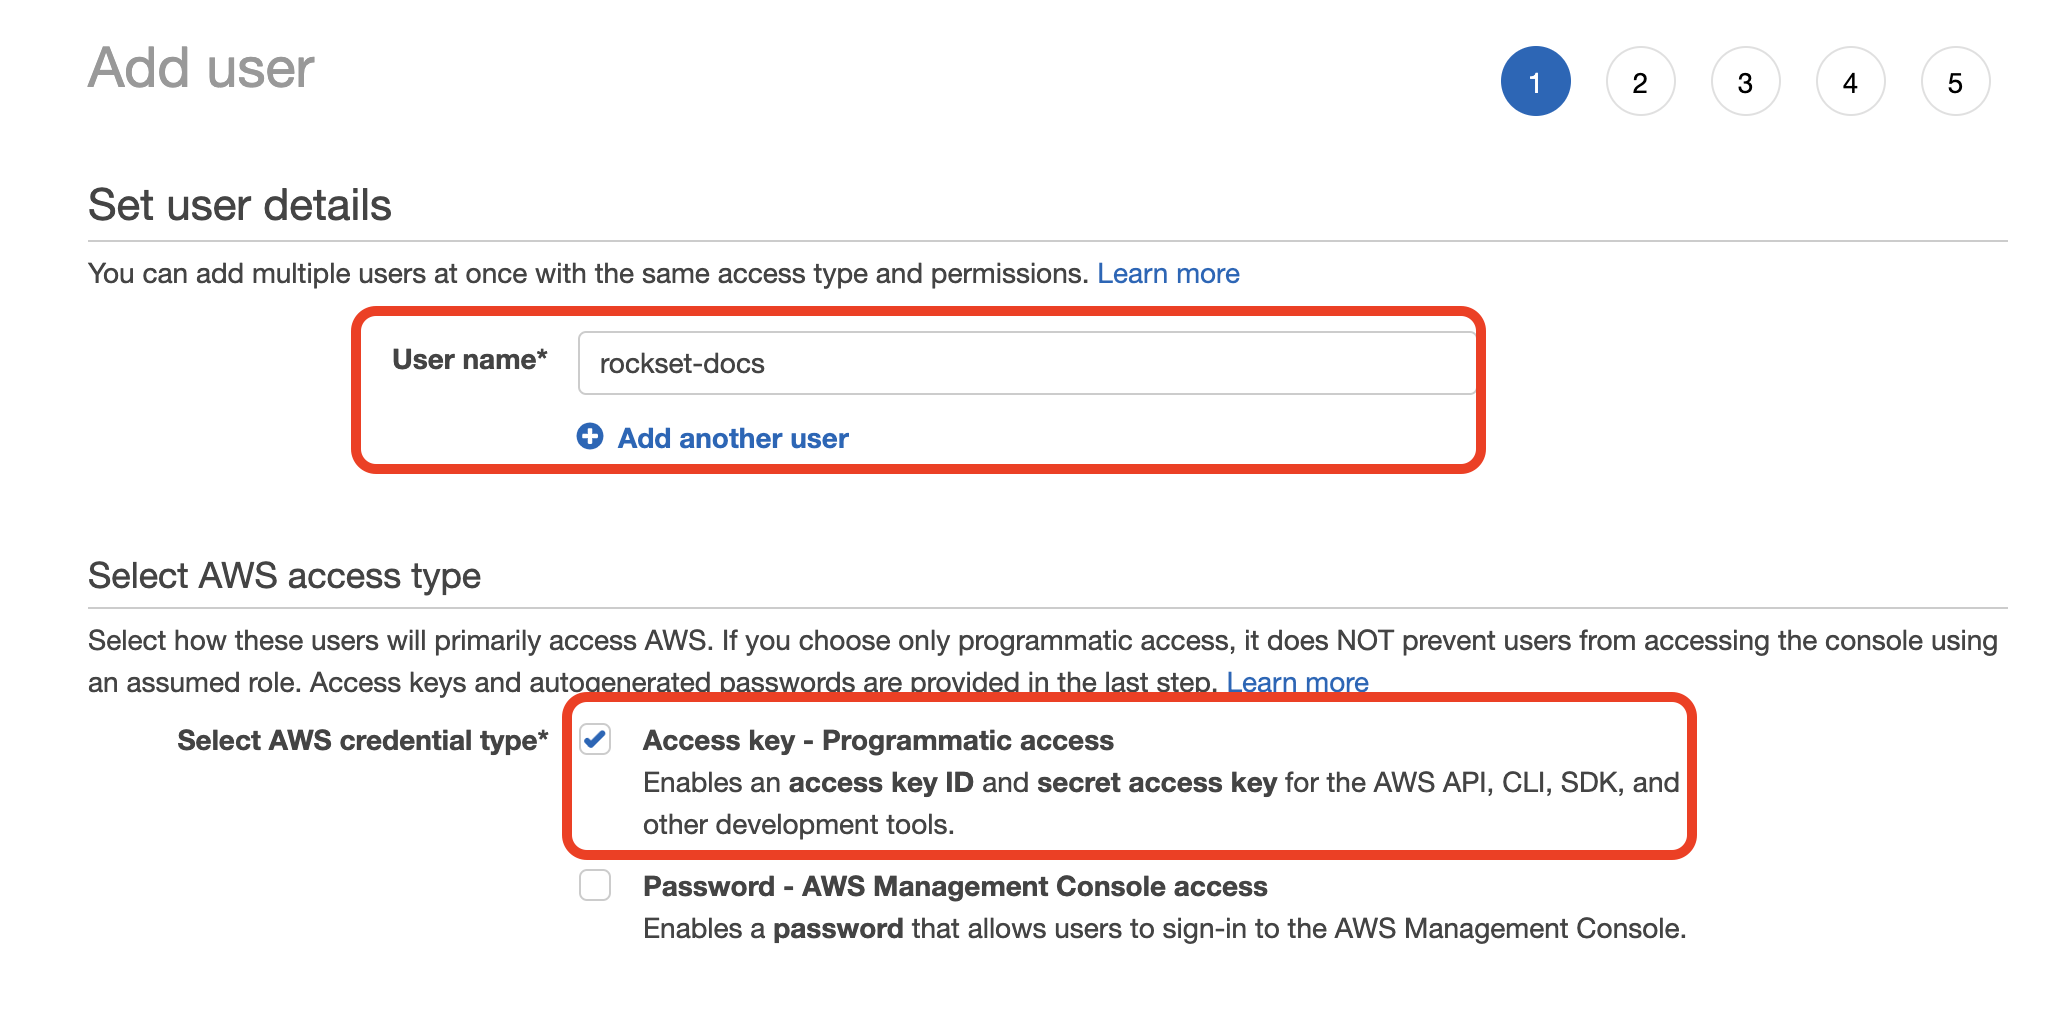
Enter a name for the user and check the "Programmatic access" option. Click to continue.
-
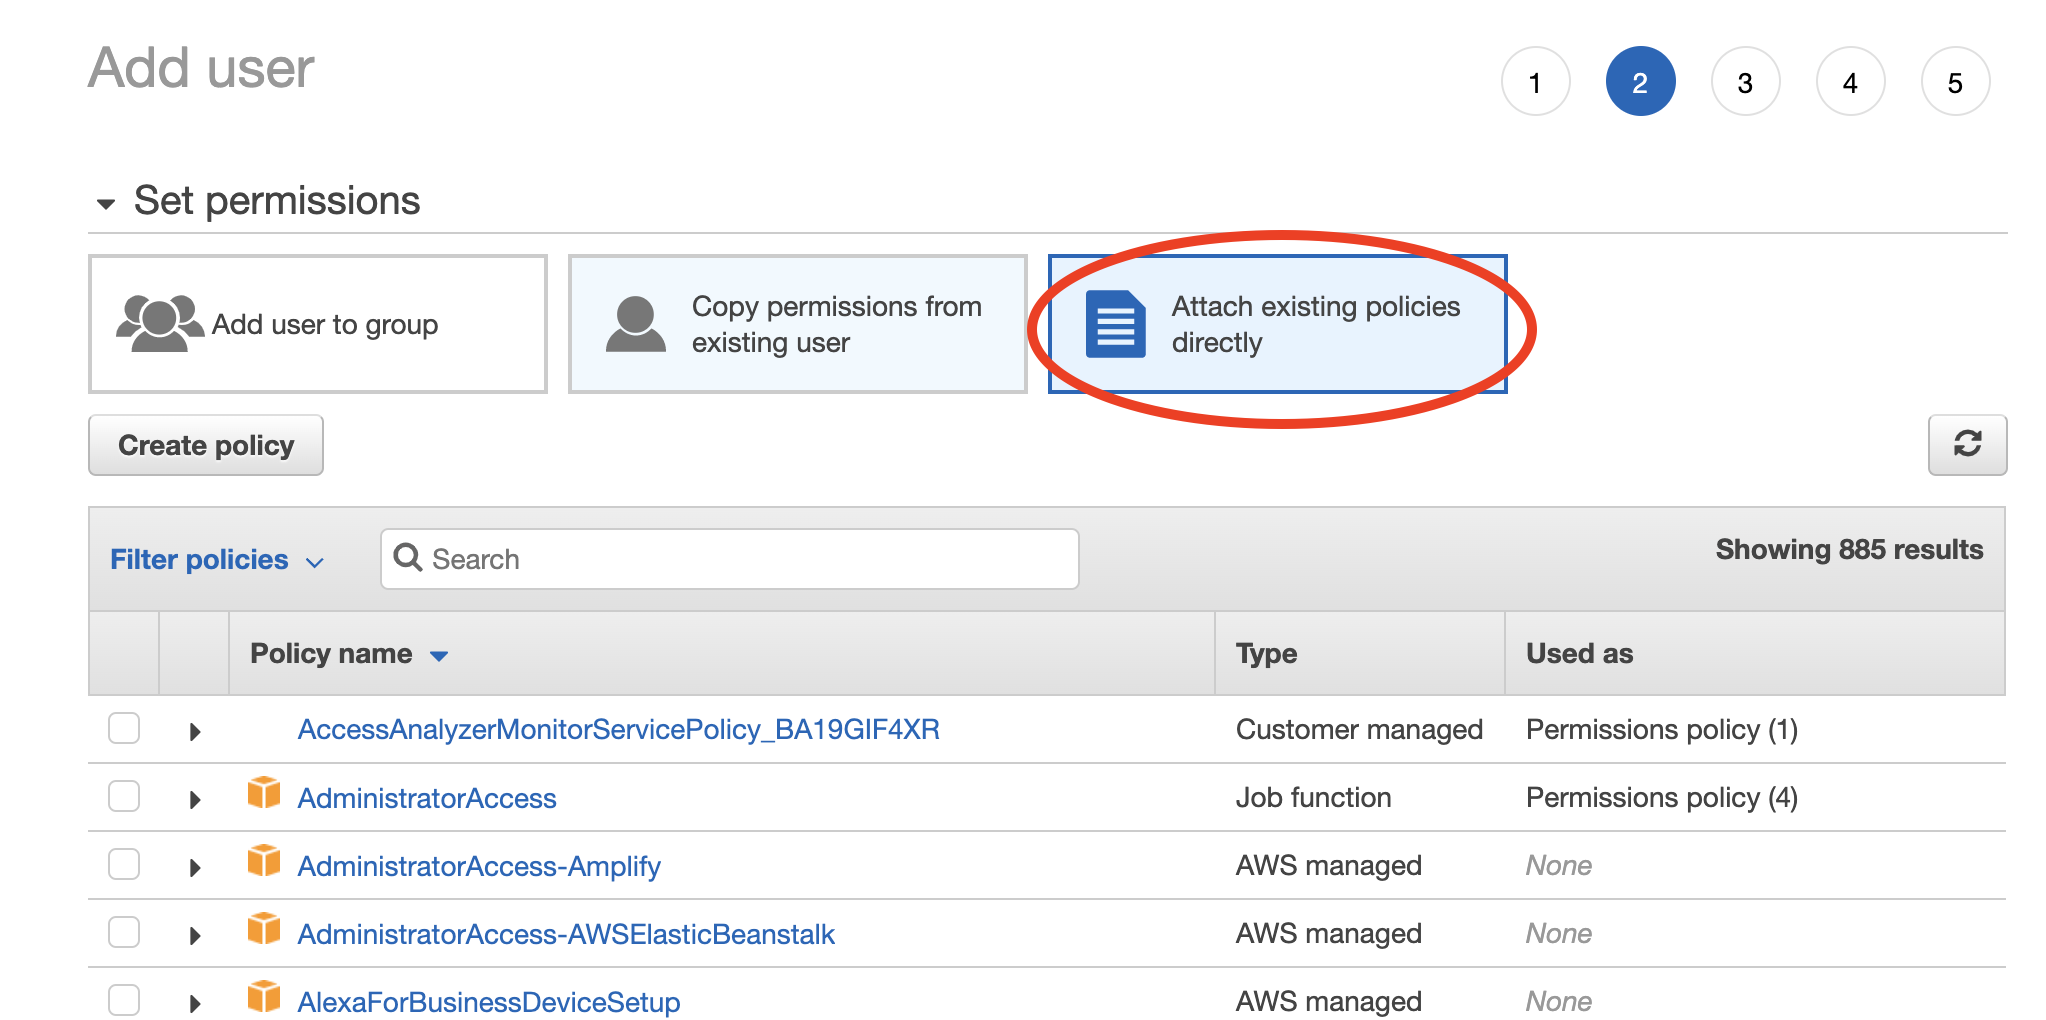
Choose "Attach existing policies directly" then select the policy you created in Step 1. Click through the remaining steps to finish creating the user.
-
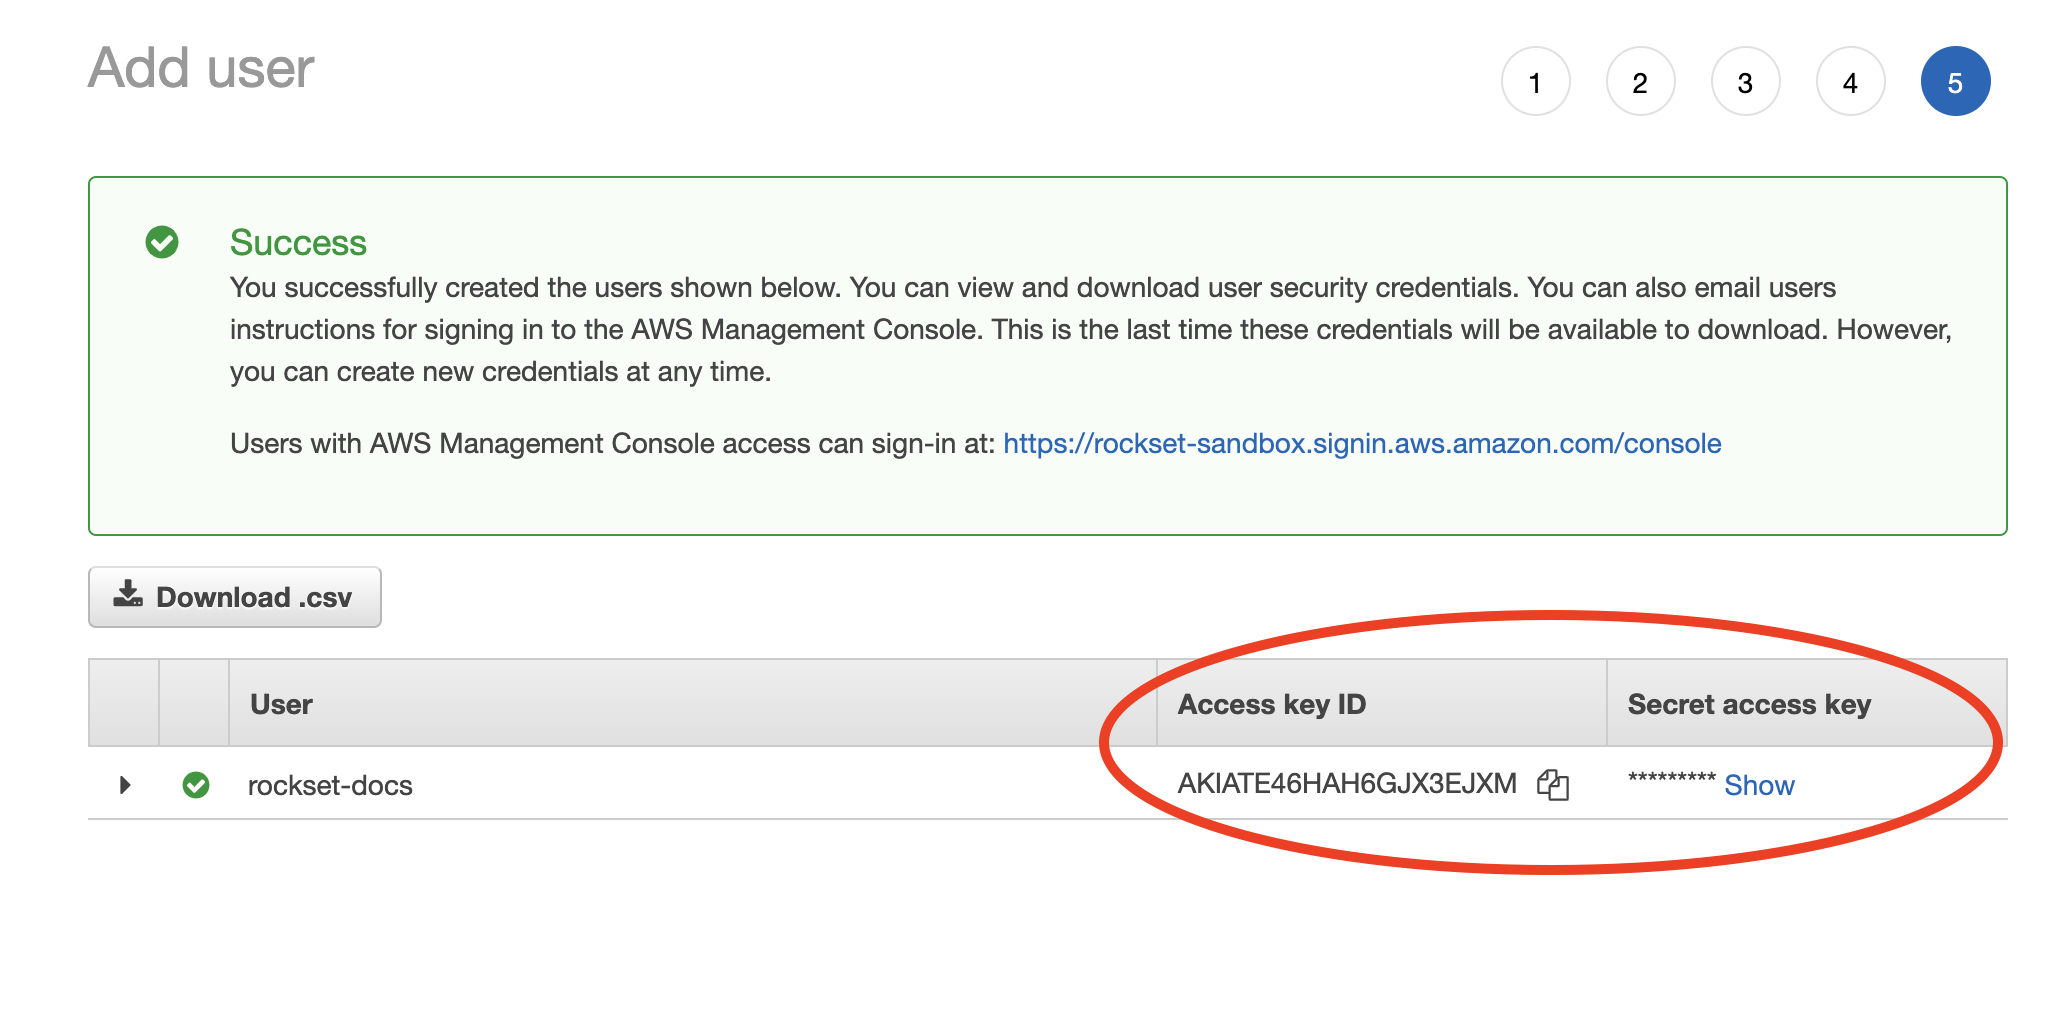
When the new user is successfully created you should see the Access key ID and Secret access key displayed on the screen.
-
Record both these values in the Rockset Console.
Create a Collection
When creating a collection in Rockset, you can specify an S3 path (see details below) from which Rockset will ingest data. Rockset will continuously monitor for updates and ingest any new objects. Deleting an object from the source bucket will not remove that data from Rockset.
You can create a collection from a S3 source in the Collections tab of the Rockset Console.
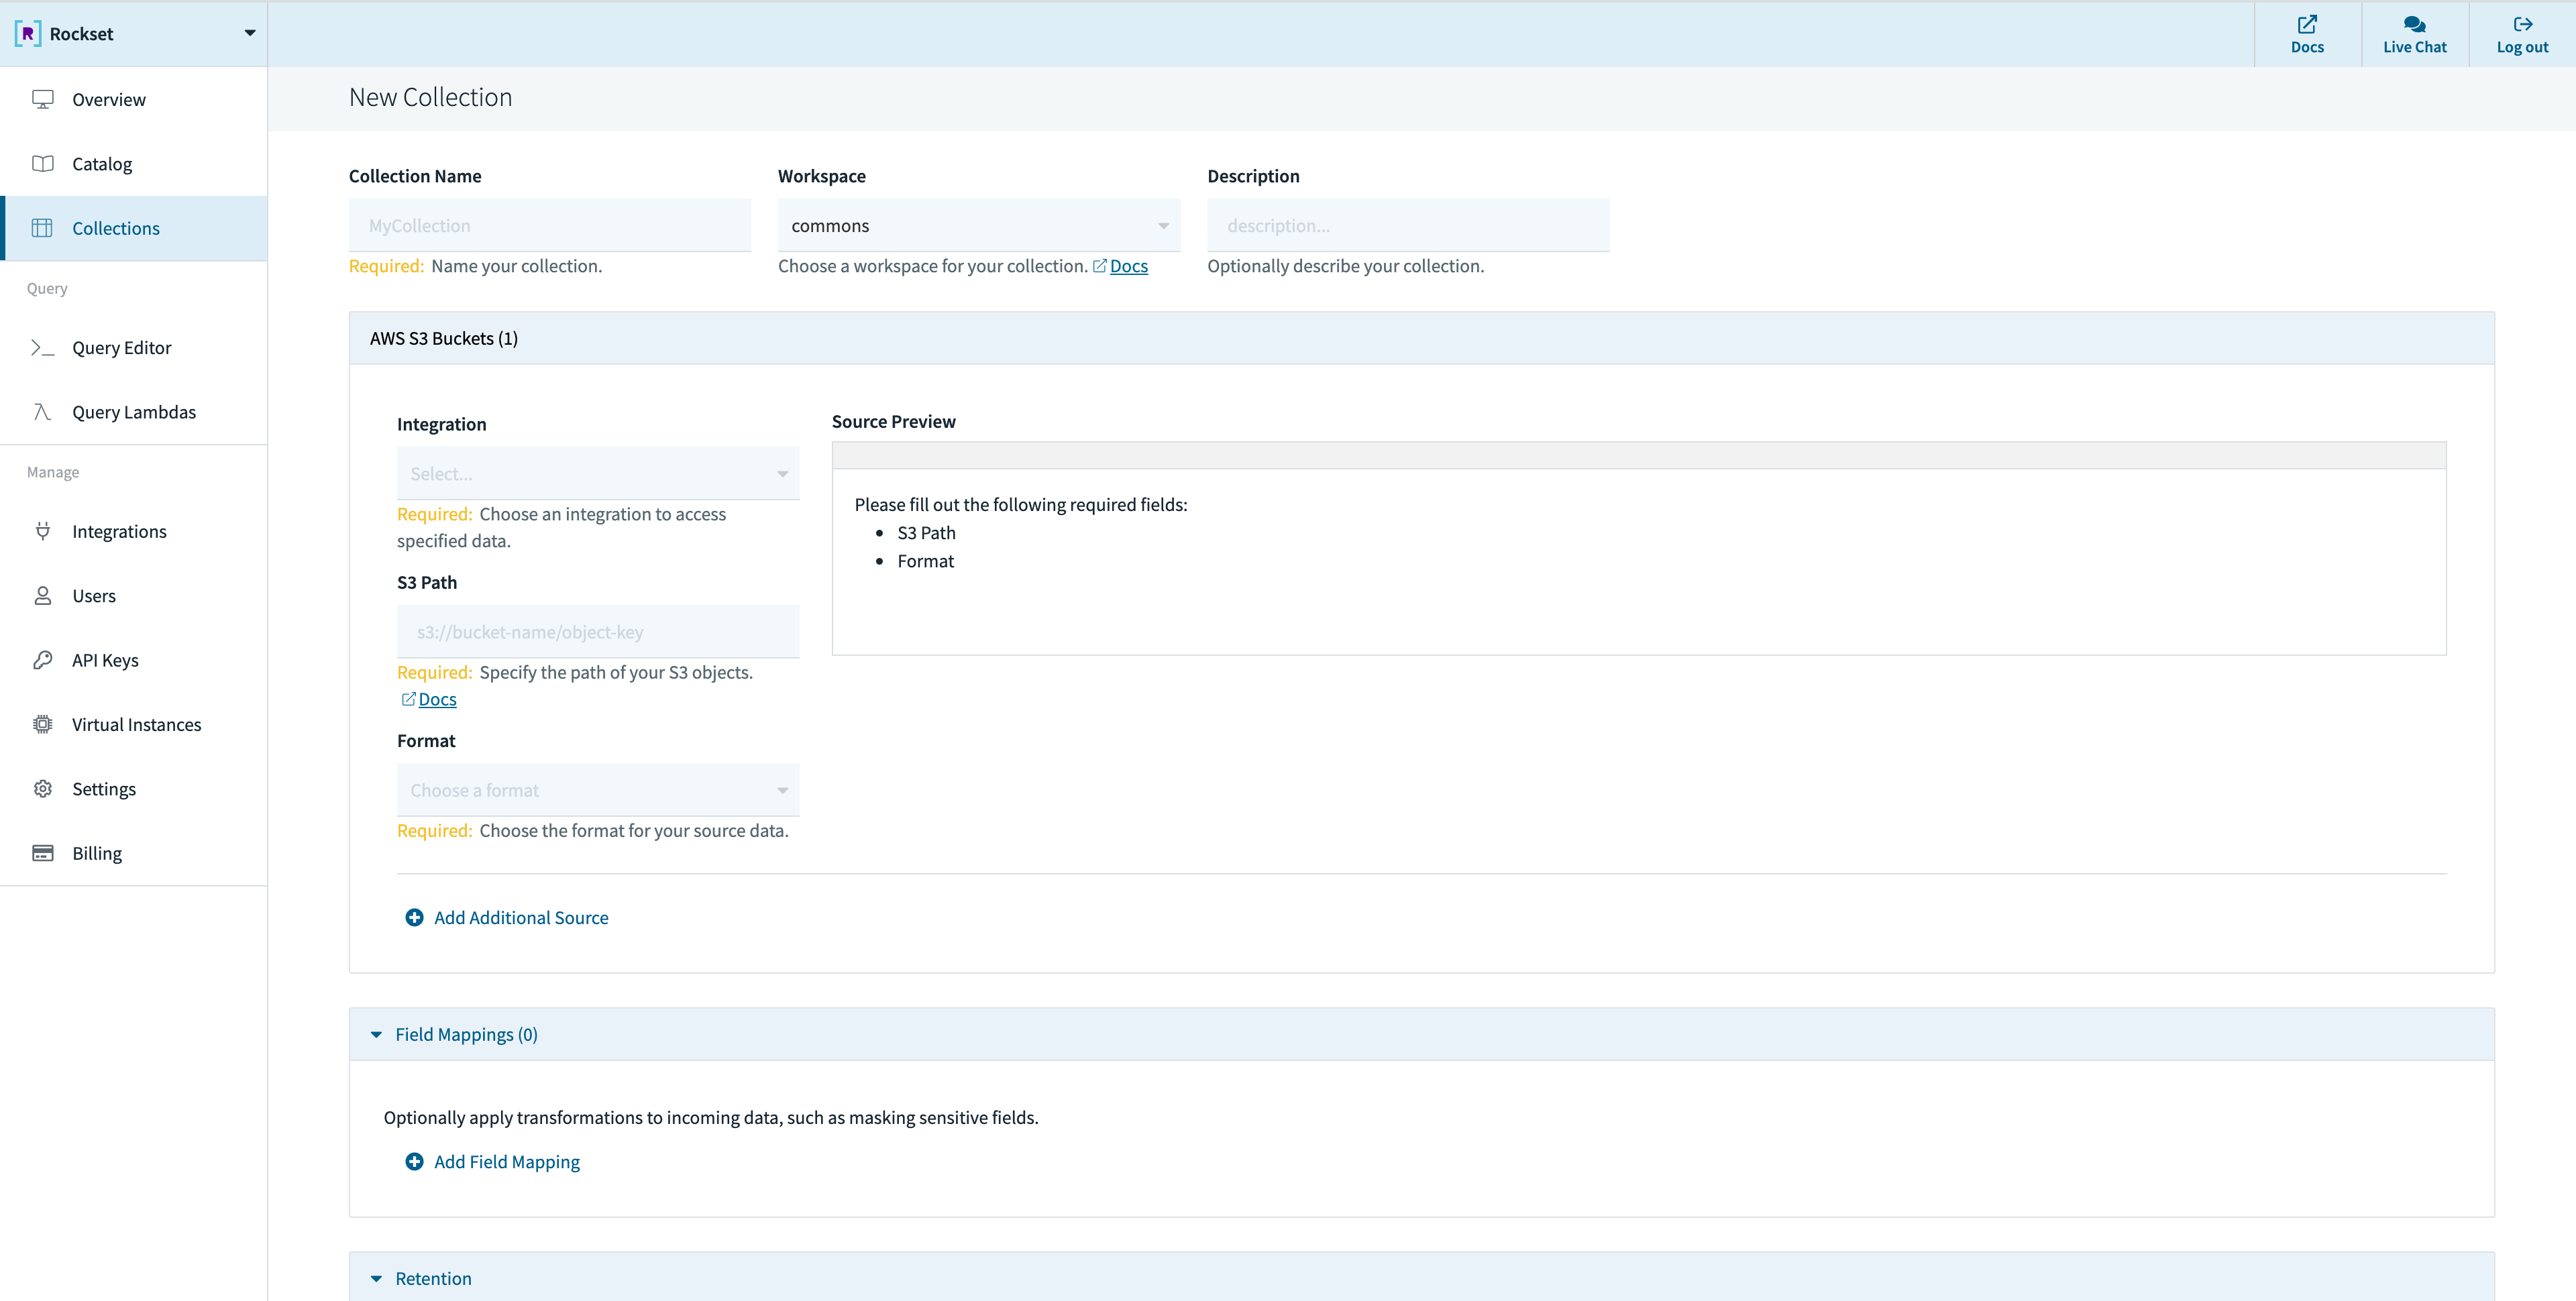
These operations can also be performed using any of the Rockset client libraries, the Rockset API, or the Rockset CLI.
Specifying S3 Path
You can ingest all data in a bucket by specifying just the bucket name or restrict to a subset of the objects in the bucket by specifying an additional prefix or pattern.
By default, if the S3 path has no special characters, a prefix match is performed. However, if any of the following special characters are used in the S3 path, it triggers pattern matching semantics.
?matches one character*matches zero or more characters**matches zero or more directories in a path{myparam}matches a single path parameter and extracts its value into a field in_meta.s3
named myparam{myparam:<regex>}matches the specified regular expression and extracts its value into a
field in_meta.s3named myparam
The following examples explain exactly how the patterns can be used:
s3://bucket/xyz- uses prefix match, matches all files that have a prefix of xyz.s3://bucket/xyz/t?st.csv- matches com/test.csv but also com/tast.csv or com/txst.csv in
the bucket.s3://bucket/xyz/*.csv- matches all .csv files in the xyz directory in the bucket.s3://bucket/xyz/**/test.json- matches all test.json files in any subdirectory under the xyz
path in the bucket.s3://bucket/05/2018/**/*.json- matches all .json files underneath any subdirectory under the
/05/2018/ path in the bucket.s3://bucket/{month}/{year}/**/*.json- matches the pattern according to the above rules. In
addition, it extracts the value of the matched path segments{month},{year}as fields of the form_meta.s3.monthand_meta.s3.yearassociated with each document.s3://bucket/{timestamp:\d+}/**/*.json- matches the pattern according to the above rules. In addition, it extracts thetimestamppath segment value if it matches the regular expression\d+and places the value extracted into_meta.s3.timestampassociated with each document.
Source Configurations
Rockset allows updating the following configurations for Amazon S3 using the Sources API:
| Configuration Name | Default Value | Min Value | Max Value | Description |
|---|---|---|---|---|
| s3_scan_frequency | PT5M | PT1S | PT1H | Rockset scans an S3 bucket based on a defined time interval. The scan frequency determines the length of time between a new scan and the previous scan. If the previous scan finds new objects or updates to existing objects, Rockset immediately scans the bucket again after processing changes from the previous scan. Duration value is of type ISO 8601 (e.g. PT5H, PT4M, PT3S). It doesn't account for DST, leap seconds and leap years. |
Best Practices
- While Rockset doesn't have an enforced upper bound on object sizes, Rockset recommends that objects in your S3 bucket stay between 5MiB and 10GiB
- Large objects (>10GiB) can't take advantage of Rockset's parallel processing mechanism and will result in slow ingestion. Splitting large objects into a series of smaller ones will yield higher throughput and faster recovery caused by any intermittent issues
- As a rule of thumb if you are going to split large objects we recommend aiming for ~1GiB in size. A readily available tool to split line-oriented data formats (like JSON or CSV) in all Unix systems is Split
- The same applies to grouping multiple large files into a single archive (like zip or tar). Rockset recommends uploading the large files to an S3 bucket without using any archiving tool so that you can take advantage of the higher throughput
- Too many small files (
<5MiB) will result in a lot of GET & PUT operations in S3, increasing the cost charged by AWS for your S3 usage - If you are using Parquet files, Rockset recommends they do not exceed 3 GiB, since that has shown to cause several issues in the past that might result in a complete failure of the bulk ingest operation
Updated 9 months ago
